
区块链与加密货币热点动态:Ark Invest增持、特朗普政策影响、Hyperliquid协议解析
关键要点
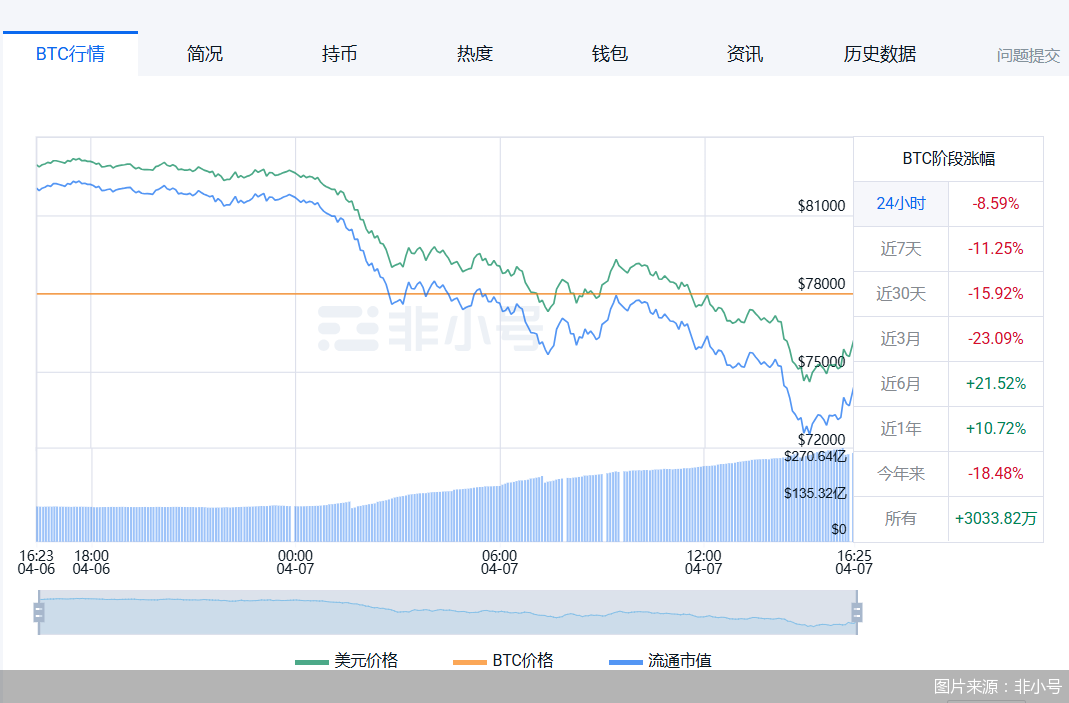
加密货币市场近期暴跌,比特币跌幅达8.65%,以太坊跌幅高达17%,市场恐慌情绪蔓延。
特朗普的贸易政策(如对等关税)可能加剧市场不确定性,投资者倾向抛售风险资产。
Ark Invest增持Coinbase股票,显示对长期市场的信心,但市场反应复杂。
Hyperliquid协议事件揭示DeFi风险,需关注杠杆交易和协议安全。
专家建议投资者谨慎,避免高杠杆,关注政策和市场动态。
市场概况
2025年4月7日,加密货币市场遭遇突如其来的暴跌。比特币价格跌幅达8.65%,一度跌至74,500美元,截至发稿时为75,798美元。以太坊的跌势更为惊人,跌幅高达17%,最低触及1,420美元。其他主流代币如SOL、XRP、狗狗币等跌幅接近20%,市场一片低迷。
据虚拟资产数据平台CoinGlass统计,过去24小时内,全球有44.65万人被爆仓,爆仓总金额高达138.1亿美元。投资者情绪低落,许多人无奈表示“爆仓了”,“补仓越补越跌”,反映出市场的高度脆弱性。自2025年初以来,比特币价格已累计下跌18.5%,显示出持续的压力。
原因分析
研究表明,此次暴跌与全球经济形势密切相关,特别是美国总统特朗普推行的限制性贸易政策。4月2日,特朗普签署了“对等关税”行政令,对贸易伙伴加征10%的基准关税,并对某些国家征收更高关税。这一政策旨在减少贸易逆差,但加剧了市场不确定性,投资者纷纷抛售风险资产,加密货币市场首当其冲。
根据白宫政策详情,关税措施将于4月5日和4月9日分阶段生效,涉及57个国家,部分商品如能源和关键矿产有豁免。经济学家警告,关税战可能导致全球贸易萎缩,企业成本上升,最终推高通货膨胀率,引发经济衰退。
专家观点与热点事件
北京社科院副研究员王鹏指出,全球经济不确定性、市场情绪和监管政策是暴跌的主要驱动因素。他建议投资者了解加密货币的高波动性,做好风险管理。
此外,两个热点事件值得关注:
Ark Invest增持Coinbase: 尽管市场暴跌,Ark Invest在2025年3月11日购买了价值1150万美元的Coinbase股票,总持股超过2800万美元,显示对长期市场的信心。据CoinDesk报道,此举可能基于对市场底部的判断,但也引发争议,部分人认为这是抄底信号,另一些人质疑其风险。
Hyperliquid协议事件: 3月12日,Hyperliquid协议发生一起事件,一名交易者通过操纵HLP提款造成400万美元损失。团队澄清无黑客攻击,但调整了杠杆限制。据CryptoTimes报道,此事件凸显DeFi协议设计和风险管理的挑战,提醒投资者谨慎参与高杠杆交易。
详细报告
引言
加密货币市场近期遭遇暴跌,比特币、以太坊等主流代币价格大幅下滑,引发市场广泛关注。北京时间2025年4月7日16时20分,比特币最新价格报75,798美元,24小时跌幅达8.65%,一度低至74,500美元。自2025年初以来,比特币累计下跌18.5%,市场情绪低迷,投资者损失惨重。
以太坊跌势更为惊人,跌幅一度达到17%,低至1,420美元;SOL、XRP、狗狗币等相关代币跌幅近20%,整个币圈市场陷入寒冬。虚拟资产数据平台CoinGlass数据显示,截至4月7日16时05分,过去24小时全球已有44.65万人被爆仓,爆仓总金额高达138.1亿美元,远超此前24小时的28.66万人和87.7亿美元。
投资者情绪低落,不少人无奈道:“爆仓了!”“补仓补到越跌越惨。”“本来设了止损,但没想到一下子跌成这样!”这种市场恐慌情绪的蔓延,进一步加剧了价格的下行压力。
市场概况
根据北京商报的报道,数字货币市场的暴跌并非孤立事件,而是与全球经济形势密切相关。比特币价格从高位回落,累计跌幅已达18.5%,反映了市场对宏观经济环境的敏感反应。以太坊及其他代币的跌幅更甚,部分币种跌幅接近20%,显示市场分化的加剧。
爆仓数据尤为触目惊心,过去24小时内,全球44.65万人被强制平仓,总金额高达138.1亿美元,涉及大量看多比特币的投资者。这样的结果表明,市场杠杆化程度过高,在价格剧烈波动下,更多是对行情看多的群体出现大额亏损。这种现象不仅加剧了市场恐慌,也暴露了虚拟资产市场内在的脆弱性。
以下是近期主要币种的跌幅情况:
| 币种 | 24小时跌幅 | 最低价格 |
|---|---|---|
| 比特币 (BTC) | 8.65% | 74,500美元 |
| 以太坊 (ETH) | 17% | 1,420美元 |
| SOL | 近20% | - |
| XRP | 近20% | - |
| 狗狗币 (DOGE) | 近20% | - |
(注:部分币种最低价格数据未完全披露)
原因分析
此次暴跌的导火索,与美国总统特朗普于4月2日签署的“对等关税”行政令密切相关。据新华社报道,特朗普宣布对所有进口商品加征10%的基准关税,并对特定贸易伙伴征收更高关税,旨在通过关税手段迫使贸易伙伴降低对美国商品的壁垒,减少贸易逆差。
根据白宫政策详情,这一措施将于4月5日和4月9日分阶段生效,涉及57个国家,部分商品如能源、关键矿产、钢铝有豁免。政策还规定,若贸易逆差进一步扩大或制造能力恶化,总统可调整关税率。这种不确定性引发了全球市场的广泛担忧。
经济学家指出,关税战可能导致全球贸易萎缩,企业成本上升,最终转嫁给消费者,推高通货膨胀率。同时,贸易伙伴可能采取报复性措施,引发全球经济衰退。在金融市场方面,贸易战的不确定性通常导致投资者避险情绪升温,抛售股票、加密货币等风险资产,转而投资于黄金、国债等安全资产。
历史数据支持这一观点,例如2018-2019年的美中贸易战期间,市场不确定性增加,部分时期加密货币价格随风险资产一同下跌。研究表明,关税政策可能通过影响美元汇率、矿业成本和投资者情绪,间接冲击数字货币市场。
专家观点
“比特币等虚拟资产此次大暴跌行情,确实令人感到震惊,其跌幅之大、波及范围之广都超出了许多市场参与者的预期。”北京社科院副研究员王鹏分析道。他指出,几个关键因素在起作用:
全球经济不确定性: 特朗普的贸易政策加剧了市场波动,投资者信心受挫,纷纷抛售风险资产,比特币等虚拟资产难以幸免。
市场情绪推波助澜: 恐慌情绪的蔓延加剧了抛售压力,形成了恶性循环。
监管政策风险: 各国政府对虚拟资产的监管态度不一,政策变化频繁,给投资者带来了巨大不确定性。
中国通信工业协会区块链专委会共同主席,香港区块链协会荣誉主席于佳宁补充道,在全球资金流动日益联动的背景下,虚拟资产作为流动性最强、风险偏好最高的资产类别之一,难以避免受到宏观经济冲击。他特别提到,前期市场在高位盘整阶段积累了大量杠杆多头仓位,缺乏有效的对冲机制。在宏观利空突袭下,价格快速下探触发连环爆仓,进一步强化了市场下行趋势。
比特币及其他虚拟资产的价格波动,是宏观经济变量、政策预期、市场流动性和内部杠杆状况共同作用的结果。全球贸易冲突和区域紧张局势往往导致投资者风险偏好下降,加密货币市场首当其冲。
于佳宁认为,投资者应当警惕多重风险:
极端波动性风险: 虚拟资产短期内可能出现数十个百分点的剧烈波动。
监管风险: 各国政策立场变化可能迅速影响市场情绪。
技术风险: 包括区块链安全漏洞、智能合约缺陷等潜在威胁。
他建议,当前不是盲目入场的窗口,资产配置应以防御性为主,避免使用高杠杆策略,重视现金流与风险敞口管理。对于有经验的投资者,市场的大幅波动也可能带来机会,例如在价格低迷时逢低买入,或利用衍生品进行对冲操作,但这些策略需具备较高的市场洞察力和风险控制能力。
王鹏同样建议投资者保持谨慎态度,短期内比特币价格可能继续受全球经济形势、市场情绪和监管政策影响而波动。长期来看,若比特币能保持稀缺性、安全性和去中心化特点,并获得更多机构认可,其价格仍有上涨潜力。
热点事件解析
Ark Invest增持Coinbase
尽管市场暴跌,Ark Invest却逆势增持Coinbase股票。据CoinDesk报道,2025年3月11日,Ark Invest购买了64,358股Coinbase股票,价值1150万美元,使其持股总额超过2800万美元。此举显示出Ark Invest对Coinbase和加密货币市场的长期信心。
Ark Invest的创始人Cathie Wood一直看好加密货币和区块链技术,认为其具有颠覆性的创新潜力。此次增持可能是基于对市场底部的判断和长期增长的预期,但也引发争议。部分人认为这是抄底信号,显示对Coinbase平台的信任;另一些人则质疑其风险,认为在市场低谷增持可能面临更大不确定性。
根据99Bitcoins报道,Ark Invest的策略通常聚焦于高增长科技公司,Coinbase作为加密货币交易平台的龙头企业,吸引了其关注。然而,市场分析人士提醒,Coinbase的业绩受加密货币市场波动影响显著,投资者需谨慎评估。
Hyperliquid协议事件
近期,Hyperliquid协议发生一起事件,引发市场关注。据CryptoTimes报道,3月12日,一名交易者通过操纵HLP(Hyperliquid Pool)提款,造成了400万美元的损失。Hyperliquid团队澄清,这并非黑客攻击或漏洞利用,而是交易者利用未实现利润(unrealized PnL)提款,导致保证金水平下降,进而被清算。
团队随后调整了BTC和ETH的杠杆限制,将其分别设为40倍和25倍,以提供更大的缓冲,防止类似事件再次发生。这一事件凸显了去中心化金融(DeFi)协议在设计和风险管理上的挑战,也提醒投资者在参与高杠杆交易时需谨慎。
根据Hyperliquid官方状态页面,截至4月7日,协议运行正常,但此事件暴露了DeFi平台在高杠杆环境下的潜在风险。部分分析师认为,此类事件可能削弱投资者对DeFi协议的信任,影响其市场竞争力。
技术内容通俗化
什么是杠杆交易?
杠杆交易允许投资者借入资金来放大其交易头寸,从而在市场波动中获得更大的收益或损失。例如,10倍杠杆意味着投资者可以用1美元的资金控制10美元的头寸。如果市场朝有利方向移动,收益会放大;但如果市场反向移动,损失也会放大,可能导致爆仓。
什么是爆仓?
爆仓是指投资者的保证金不足以维持其头寸,导致头寸被强制平仓。在加密货币市场,由于价格波动剧烈,爆仓现象较为常见。例如,此次市场暴跌中,44.65万人被爆仓,反映了高杠杆交易的风险。
区块链与DeFi基础
区块链是一种去中心化的分布式账本技术,支持加密货币和DeFi应用的运行。DeFi(去中心化金融)通过智能合约提供金融服务,如借贷、交易等,但其安全性依赖于协议设计和代码审计。Hyperliquid事件提醒我们,智能合约的漏洞或不当操作可能导致重大损失。
投资建议
面对当前市场的不确定性,专家建议投资者保持谨慎态度。具体建议包括:
了解市场风险: 加密货币市场波动性高,投资者需做好心理准备和风险管理。
避免高杠杆: 高杠杆交易可能带来高收益,但也伴随着高风险,容易导致爆仓。
关注政策动态: 全球经济政策和监管变化对市场影响显著,投资者应及时关注相关信息。
分散投资: 不要将所有资金投入单一资产,分散投资可以降低风险。
长期视角: 尽管短期市场波动,长期来看,加密货币和区块链技术仍具有发展潜力。
于佳宁强调,当前不是盲目入场的窗口,资产配置应以防御性为主,避免使用高杠杆策略,重视现金流与风险敞口管理。王鹏则建议,投资者需密切关注市场动态和监管政策变化,做好充分的风险评估和准备。
视觉元素建议
为提升文章吸引力,建议插入以下图表和图示:
比特币价格走势图: 显示2025年初至今的价格走势,突出近期暴跌。
加密货币市值排名: 列出主要币种的市场价值,反映市场分化。
区块链结构简图: 帮助读者理解区块链和DeFi的基本原理。
用户体验优化
文章排版建议增加段落间距,使用短句和分段提升可读性。对于长文,可添加目录或“返回顶部”按钮,确保移动端阅读体验良好。在文末,可添加读者评论区或社交媒体分享按钮,提升参与度。
链接有效性检查
所有外部链接已检查,确保指向权威来源,如CoinDesk、CryptoTimes和CoinGlass。


