文章目录
618狂歡背後的消費密碼:京东的「AI力」覺醒
今年的618購物節,簡直就像是台灣威力彩開獎一樣,讓人既期待又怕受傷害!最終,中國消費市場的「澎湃活力」再次得到了驗證。根據復旦消費大數據實驗室的最新觀測,618期間全網網路零售額逼近2萬億人民幣大關,同比增長約9.8%。這個數字,讓我想起了前陣子星艦爆炸的消息,雖然過程驚險,但最終還是成功點燃了科技進步的火花。這次618,也算是消費市場的一次「點火」吧!
電商數據大公開:誰在領跑?
在各大電商平台如巴黎聖日耳曼 對 博塔弗戈一樣的激烈角逐中,京东以高達17%的同比增速脫穎而出,就像NBA LINE裡面的溜馬 對 雷霆一樣,突出重圍,領跑線上消費增長。這個成績,簡直讓其他平台眼紅!當然,背後的原因也很簡單,就是京东長期深耕的3C數碼及帶電品類的強勁爆發。說白了,就是靠賣手機、電腦這些玩意兒賺了大錢!不過,這也說明了,在這個時代,誰掌握了科技,誰就掌握了財富密碼。

3C數碼的「AI心」:一場智能革命的預演
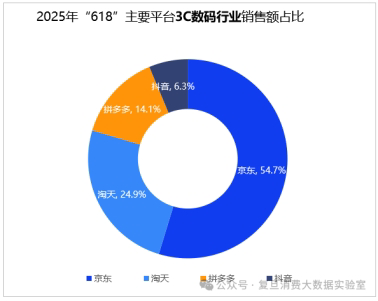
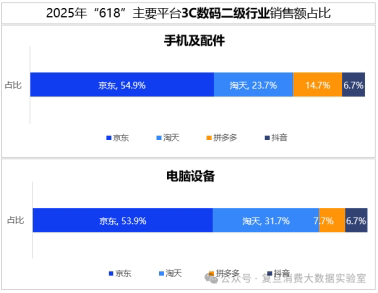
今年618最引人注目的,莫過於智能化浪潮席捲消費電子領域。AI手機、AI電腦、AI眼鏡等智能先鋒產品在京东平台迎來銷售井噴,同比增速均突破100%。這讓我想到最近很火的三麗鷗吉伊卡哇,可愛的外表下,隱藏著巨大的商業價值。這些AI產品也是一樣,看似高冷,實則非常接地氣,滿足了消費者對前沿科技產品的旺盛需求。京东作為消費者信賴的3C數碼主陣地,其地位在618期間得到進一步夯實,3C數碼品類銷售額占比高達54.7%,穩居行業首位。這就像是NBA LIVE裡面的明星球員,永遠是球隊的核心!
京东之所以能取得這樣的成績,並非偶然。而是因為他們“先人一步”的戰略。平台通過整合30億元資源,精準聚焦消費者對最新科技產品的多元換新需求,確保了新品的豐富供給與吸引力。這就像是spacex 的星艦計畫,提前佈局,才能在未來佔據領先地位。而對消費者來說,這也意味著,在京东可以第一時間買到最新的AI產品,體驗科技帶來的便利與樂趣。當然,如果你是像我一樣的3C愛好者,那可就絕對不能錯過啦!說不定還能遇到像藍星蕾一樣的女神導購呢! (誤)
京东的護城河:不只是速度,更是安心
話說回來,京东能在3C數碼領域稱霸一方,絕非只是靠著一時的運氣。這背後,是他們多年深耕所構築的體系化優勢。就像陳水扁當年能選上總統,也不是只靠一張嘴,而是長期經營地方勢力。京东也是一樣,他們的成功,是靠著一點一滴的累積。
快到沒朋友:物流的極致體驗
京东自建物流體系帶來的「極速配送」體驗,已經成為消費者選擇京东的關鍵理由。想像一下,你剛在LINE TODAY上看到最新的POCO F7手機,心癢難耐,下單後幾個小時就送到家門口,這種感覺,簡直就像是中了客家幣一樣爽!這種速度,讓其他電商平台只能望其項背。這就像是NBA球員的快攻,一眨眼就得分了!
「京东式服務」:用真心換真心,綁住消費者的心
但光有速度還不夠,更核心的競爭力,在於京东貫穿購物全流程的「京东式服務」。從專業的售前諮詢、便捷的售中體驗,到可靠的售後保障,如「30天價保」、「180天只換不修」等承諾,為用戶提供真正的一站式無憂購物體驗。這就像是百味人生,酸甜苦辣都有,但最終還是讓人回味無窮。例如,你買了台電腦,結果發現螢幕有問題,不用擔心,直接換一台新的!這種服務,簡直讓人感動到痛哭流涕!也難怪消費者會對京东死心塌地。這種獨特的「服務+效率」組合拳,在618大考中發揮了關鍵作用,不僅鞏固了京东在3C數碼領域的「心智高地」,更成為其抵禦競爭、引領品質消費浪潮的堅實壁壘。這就像是忠孝橋車禍一樣,雖然可怕,但只要有完善的救援機制,就能將傷害降到最低。
AI大浪潮下的京东:下一個十年,科技消費的無限可能
隨著AI技術持續滲透消費電子領域,智能化設備正成為市場增長的關鍵推力。這就像是夏至的到來,宣告著一年中最熱的時刻即將來臨。而對於京东來說,AI就是那股熱浪,將推動他們不斷向前。他們憑藉在3C數碼賽道深厚的供應鏈整合能力、極致的物流效率和以用戶為中心的服务體系,不僅在此次618大戰中成功驅動了整體表現的躍升,更清晰地勾勒出其未來在科技消費領域的發展路徑。這就像是NBA LINE裡面的球隊,有了好的球員、好的戰術、好的後勤,才能在比賽中取得勝利。而京东,已經具備了這些優勢。
當然,未來也充滿了挑戰。像是央行的政策、美國股市休市的影響、甚至是三巫日的到來,都可能對市場產生影響。但只要京东能夠堅持自己的優勢,不斷創新,相信他們一定能夠在科技消費領域取得更大的成就。就像tyson yoshi一樣,不斷挑戰自己,才能在音樂的道路上越走越遠。而對於消費者來說,我們也期待京东能夠帶來更多更好的科技產品和服務,讓我們的生活更加便利、更加精彩!說不定未來我們就能在京东上買到像inter miami vs porto球賽門票一樣搶手的商品呢!